The process of tincturing, for example, uses a liquid or menstruum derived from either alcohol or glycerin to extract and concentrate these medicinal properties, which can be readily taken up and put to use by the body. Compare this process to making cold-brew coffee, for example. Cold-brew requires steeping coffee grounds in water overnight. The final product is a highly concentrated batch of caffeine and other compounds in liquid form that can either be diluted or taken straight depending on desired potency.
Tinctures are only one technique for making plant medicine. Herbs can be used both internally and topically to address a spectrum of health complications. In addition to tinctures, I enjoy making salves that soothe cuts, burns, rashes, and abrasions. In a healthcare system that prioritizes expensive quick-fixes like pharmaceuticals and invasive surgeries, discovering the inherent medicine found in common, abundant plants can literally be a life-saver.
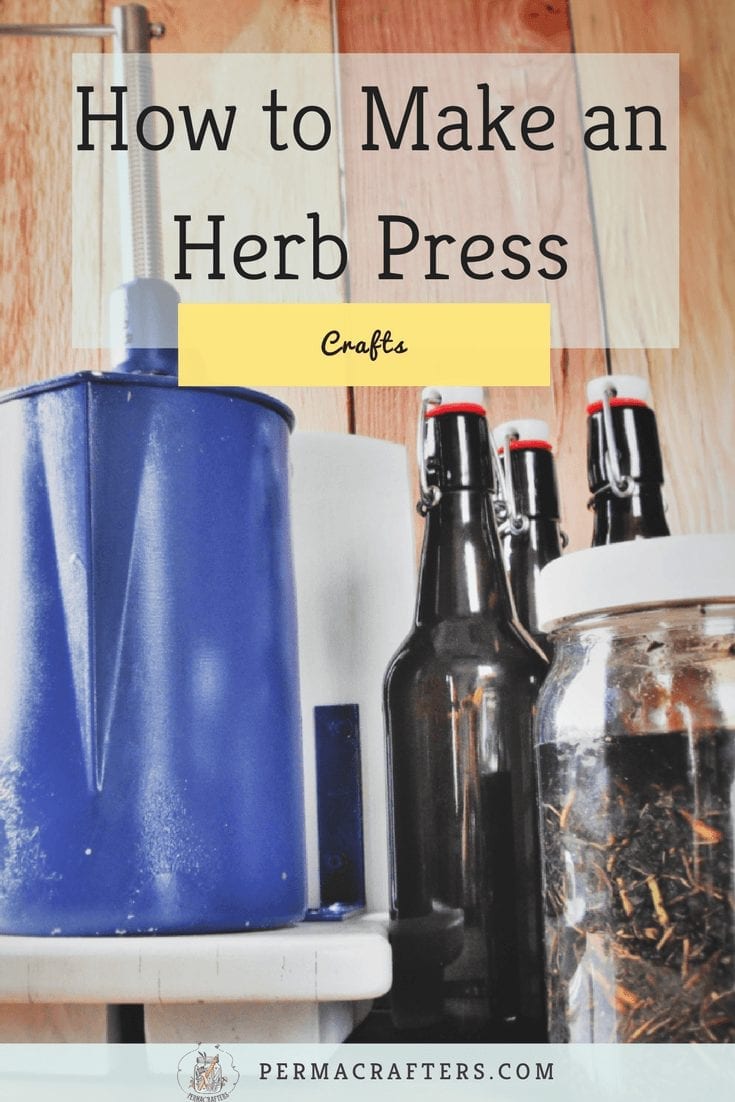
The Herb Press
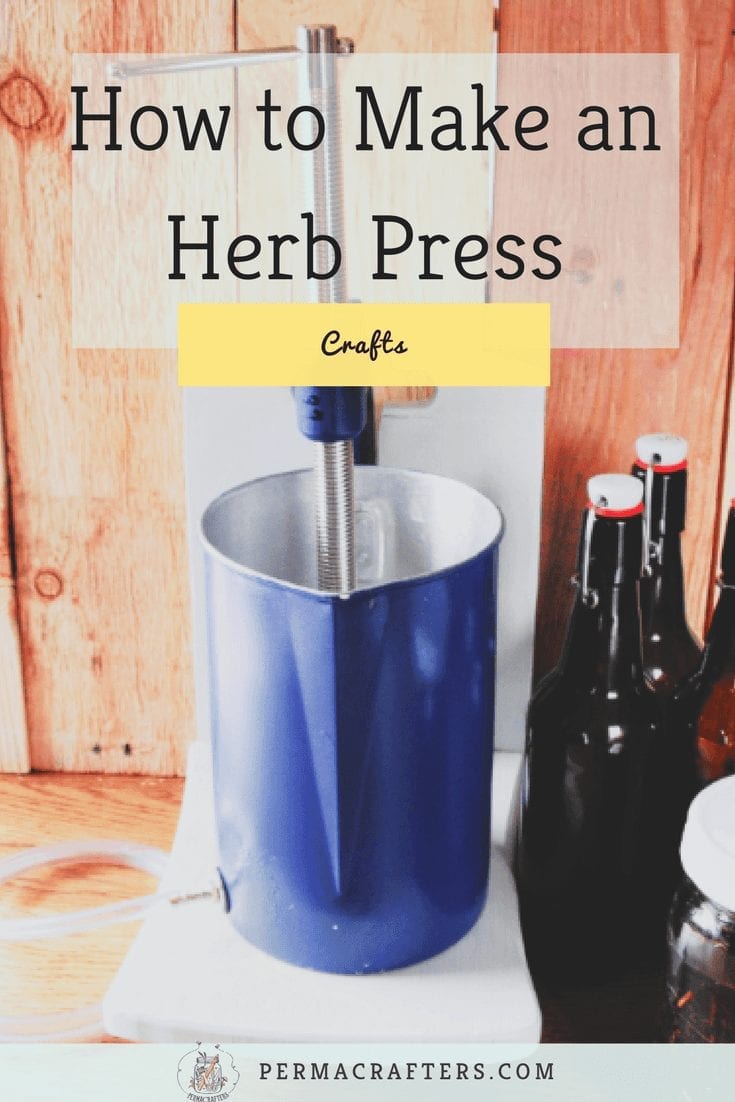
After researching various models of herb presses, I settled on the C-clamp method with modifications. The main reason I chose the C-clamp is because I can use the clamp as an actual clamp in other projects when I am not making tinctures or concentrates. This adds versatility to my tools and avoids the dreaded uni-tasker that a conventional herb press implies. I am not running an herb business, so I am not getting a lot of use out of this machine. It suits my needs for the amount of tincture I make.
The ultimate value of going to the “trouble” of making your own herb press (or anything homemade) is to create something personal and functional that takes from the waste-stream, encourages resourcefulness, and reunites the invaluable teamwork of your hands and brain. You are encouraged to develop any modifications to this model with the resources available to you at any given time.
The Hardware
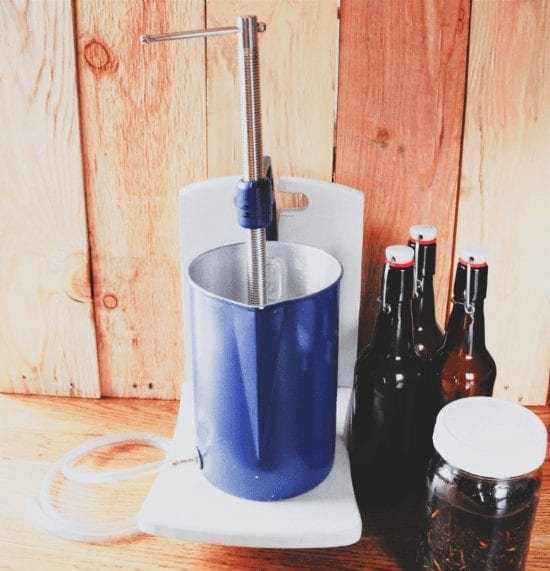
Pictured below is the hardware assembled to build this contraption. All materials were purchased from local thrift stores Goodwill and Habitat for Humanity Restore and from locally-owned hardware stores Kleindorfer’s and Bloomington Hardware.
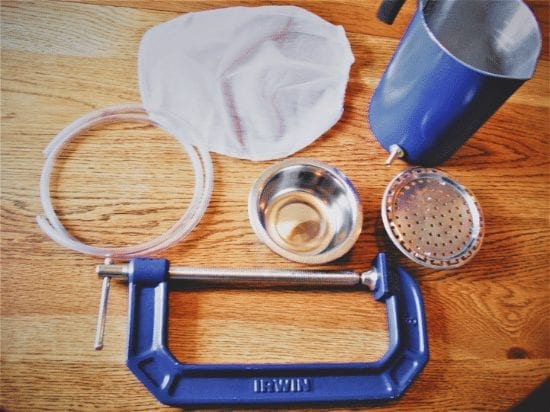
Starting from the top and working clockwise to the center:
- Paint-strainer Bag – Originally used to strain paint. It has elastic around the opening to hang on a bucket. It is now used to strain the liquid from the plant material. It keeps the plant material neatly contained and can be rinsed and reused repeatedly unlike cheesecloth.
- Metal Pitcher – This contains the strained liquid and feeds into the next vessel. It is fitted with a barbed spigot that connects to the feeder tube and gaskets to create a water-tight seal. The spout feature is helpful for pouring out the remaining liquid that does not pass through the tubing. Note: I try to avoid using plastics, as these caustic liquids encourage leaching. Stainless steel or glass is the way to go whenever possible when dealing with food or drinks.
- Steamer Tray – Originally used to steam vegetables, the collapsible flaps were removed (can be used for another art project) leaving only the base with legs to keep it off the bottom of the pitcher.
- 8” C-clamp – The mechanism that provides the force to extract the liquid from the plant material.
- Tubing – Connects to the barbed spigot that transports the liquid to the receiving vessel.
- Metal Bowl – Used to expand the surface area of the C-clamp, distributing the weight of the pressing feature evenly over the plant material.
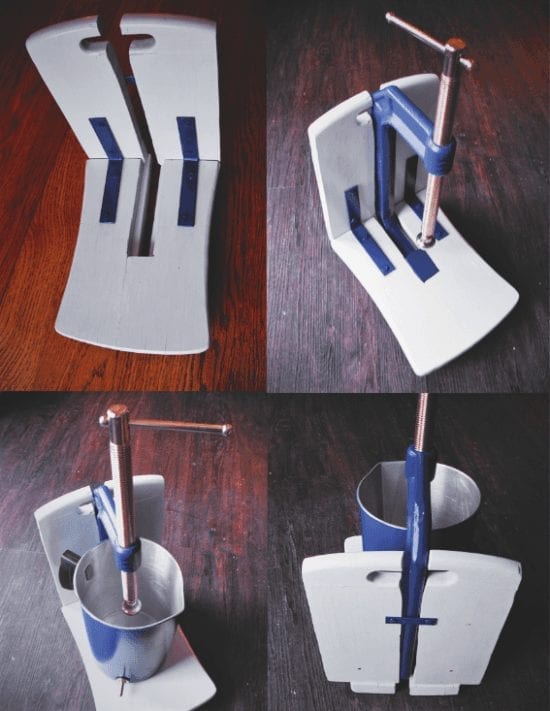
The Clamp Stand
There are models using the C-clamp as hand-held, but this gives you a little more freedom in handling. The press can be tightened to a degree and left to sit for a minute, extracting the liquid somewhat, and then tightened further to extract the remaining liquid.
For this prototype, I modified small wooden cutting boards to fit around the C-clamp. These are a dime a dozen at the local Goodwill. I purchased small brackets to reinforce the nails and glue that initially fastened the boards together. I painted the wood and brackets for aesthetic purposes with used paint found at my local Habitat for Humanity Restore. This is an opportunity for you to get creative and design a clamp stand out of whatever materials you have nearby.
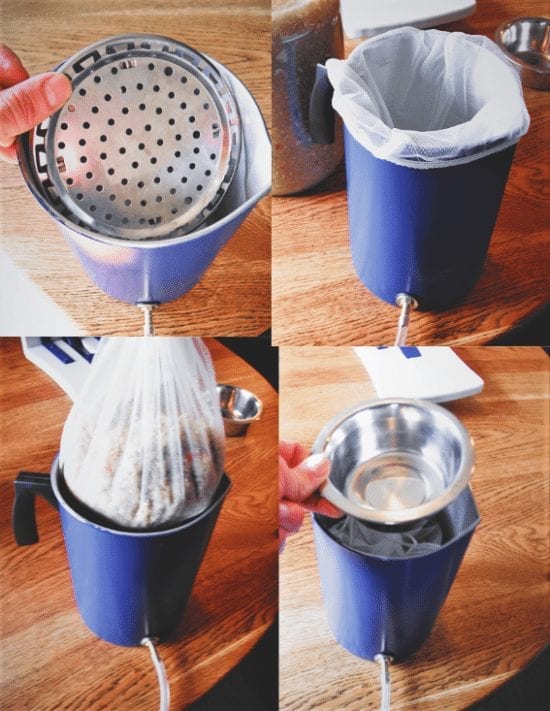
Assembling and Using the Press
- Connect the tube to the spigot and insert the tube into the receiving vessel (a 16 oz bottle in this example)
- Insert the steamer tray
- Secure the mesh bag to the pitcher
- Pour any free liquid (menstruum not in need of pressing) through the strainer and allow it to pass into the receiving vessel
- After all of the free liquid is poured, begin transferring the plant material into the mesh bag. Depending on the size of your batch, you may want to do this a little at a time.
- Synch the bag with twine and place on top of the steamer tray
- Center the metal bowl on top of the bag
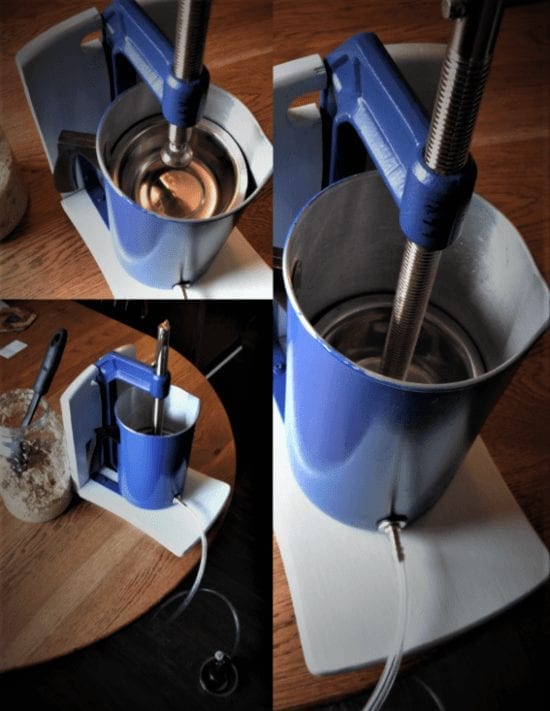
- Begin tightening the clamp until it meets the metal bowl. Make sure the bowl is still centered.
- Tighten incrementally. Depending on the quality of your metal, you may not want to stress it too much. In this prototype, the metal pitcher and bowl came out distorted as a result of the pressure from the clamp.
- Continue the above steps until all of the plant material is pressed. Reposition the bag of plant material one or two times to be thorough.
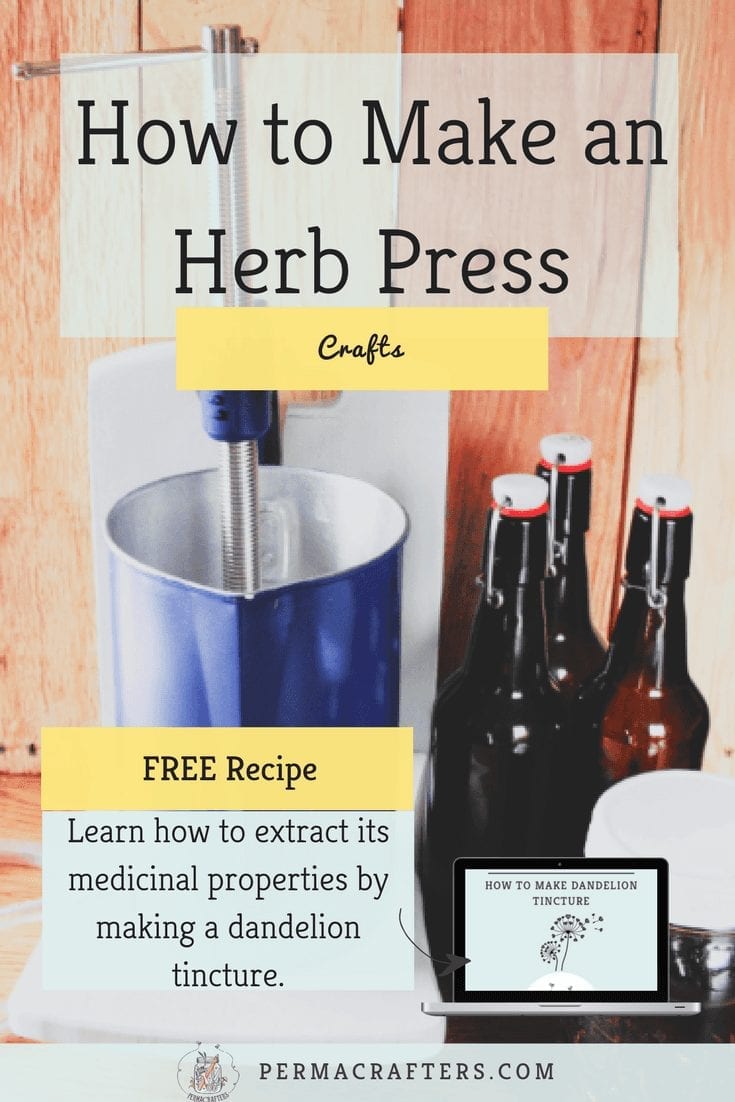
The Finished Product
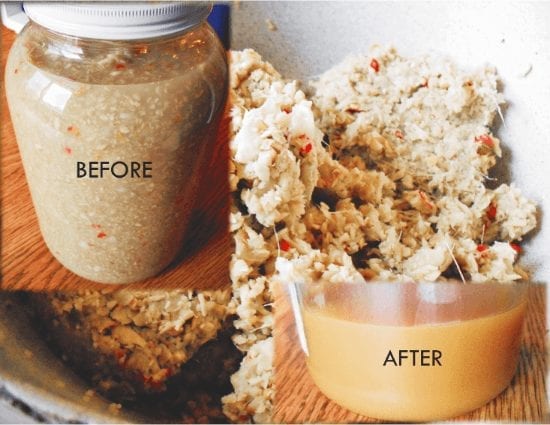
In this example, I strained a batch of master tonic*. The result is the strained plant material, or marc, and the concentrated liquid. For master tonic, I can use the marc in cooking. When making tinctures, discard the marc into the compost bin. The liquid was conveniently transferred into these bottles and ready to consume and potentially distribute.
*Master tonic is a pickled drink made using: apple cider vinegar, white onion, ginger, garlic, horseradish, and dried cayenne pepper. Steeped for three weeks much like a tincture, master tonic is used as a preventative/reactionary cold and flu remedy, containing anti-bacterial and anti-viral properties.

Ready to use your herb press?
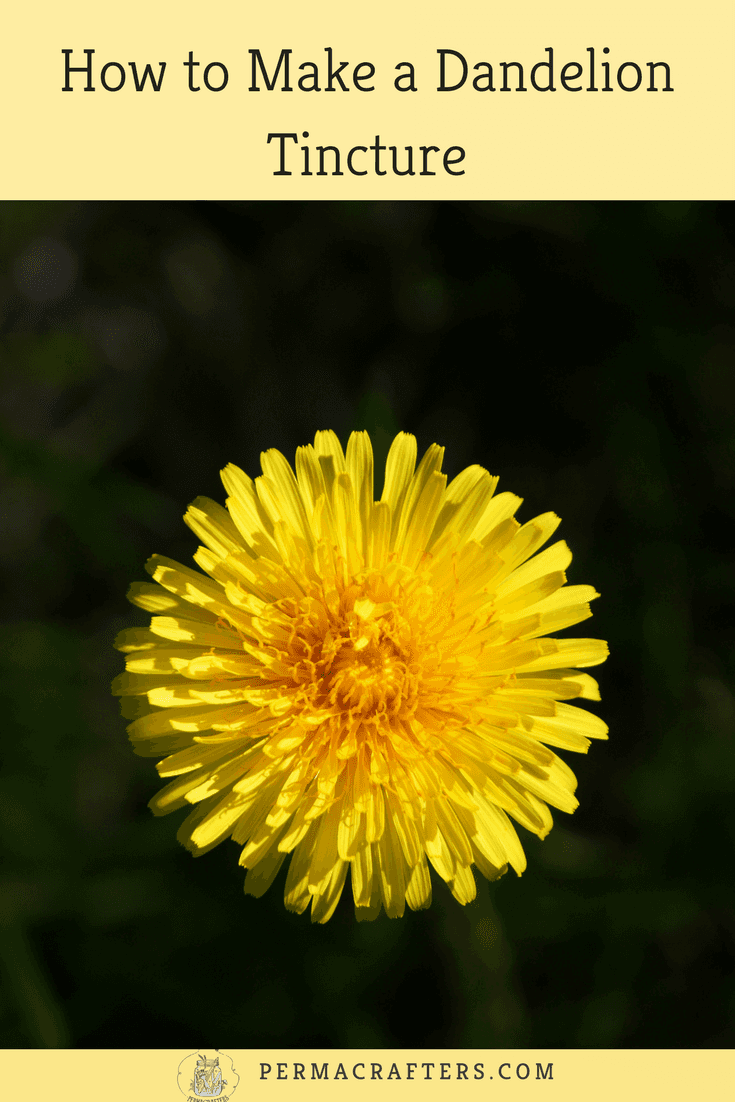
Sign up to learn how to make a dandelion tincture using your herb press. Dandelion is a powerful blood-cleanser and diuretic. Learn how to extract its medicinal properties by making a dandelion tincture.
Will you give this herb press a try? Let us know your experience in the comments below! You might enjoy using your herb press to make this homemade elderberry syrup recipe or our anti-anxiety tincture.
May the forbs be with you,
Mike.
Herbal Remedies | FREE Trial
![]()
Join the free Herbal Remedies course sample to learn how to make a menstrual tincture and to learn basic foraging skills.
About us

Get all our FREE booklets & online video courses.

Join over 9,000 students who have signed up for this amazing content to work towards a more sustainable lifestyle that respects Mama Earth.
Michael Richter
Author

After spending time in academia, Mike set out to grow both plants and people in the alternative agriculture scene, eventually teaching Permaculture and designing edible landscapes. Mike is currently trying his hand (and patience) at wood working and other crafty endeavors through Small Axe Woodworks.
By commenting you accept our Privacy Policy.

Nice site! Found you on a goodwill post. We are a small manufacturer of herbal skin care products. We source our ingredients to our own gardens and others in our Brown County, Indiana area. I will look forward to your email updates – I just signed up for plus I’ve added this site to my favorites. I like the shared knowledge.
Regards,
Constance R. Pottenger
Did you buy the spigot on the metal pitcher? I’m trying to find materials to try and make my own, but I cant find a pitcher like that or the spigot hardware.
Hi Rylan,
I’m glad you are making your own press! Yes, I bought the brass, barbed spout (or brass hose barb) along with two rubber washers at my local hardware store. You likely will find them among the hose connectors in the plumbing or garden section of a given store. If you have a Habitat for Humanity Restore by you, they might have some.
Send us pictures when you are finished!